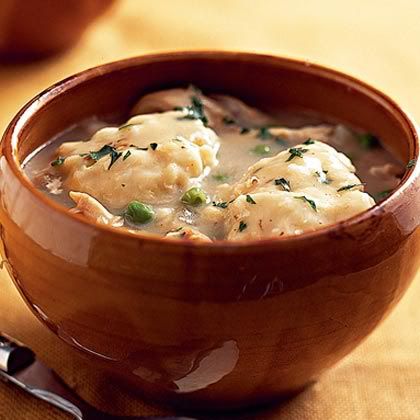
Somewhere Michael got the idea he wanted chicken and dumplings. I have no idea where he even heard of it. He asked Rachael if she knew how to make them and she humphed. Rachael doesn’t believe in anything that takes more than twenty minutes to prepare. She especially doesn’t like two or three stage recipes. She does menu items that require quick easy steps. One, two, three, done - with each step requiring a corresponding number of minutes. I don’t blame her. She works all day and then comes home and fixes dinner. Nobody feels like working another hour and a half to get dinner. The good thing is that she doesn’t have hungry kids fussing to eat. Michael and I don’t care too much when we get around to eating. Often we don’t have supper until seven or after.
Hence. When Michael asked for chicken and dumplings it didn’t meet with a lot of enthusiasm on her part. The immediate response was, “Mom knows how to make them." So a little while ago I cleaned and cut up a chicken to put on for stewing. It is sending good smells all over the house right now and it still has to cook a while. I’m gonna be the World’s Number One Mother-in-law when Michael comes in the door and smells that!
I learned to make dumplings when I was really young. Dumplings are a good source of energy for poor hard working people. My grandma raised 13 kids on a poor farm in southern Ohio on the river. There were ten boys and grandpa believed in making them work. Grandma had to supply the energy for that. Dumplings are loaded with carbohydrates - a great source of energy. She could take stewed fruit or vegetables or meat and drop dumplings in to stretch them and add needed calories. She could stew one old hen that had quit laying and use the broth and shredded meat to feed the whole crew. It might not be good dietary consideration today, but in the early 1900’s it was a god-send for mothers of hungry, growing kids.
When I was little we were definitely better off financially that Grandma and Grandpa, but the thrifty measures learned in childhood stood my mother in good stead. Her favorite recipes were chicken and dumplings or peas and dumplings. And before you turn your nose up at peas and dumplings let me say you are missing a good meal. Take a couple cans of peas, juice and all. Heat them up in a good sized kettle, add a little chicken broth or milk or even water in a pinch with some additional salt and a good dollop of butter. Then when it boils carefully drop dumplings, either by teaspoonfuls or cut into squares, into the boiling liquid. Good stuff.
Okay, gotta go check my chicken.
Chicken and dumplings is at best a two phase dish and if you want to get fussy it’s a three step. First you clean and stew your chicken. If it is an old hen it has to stew on low heat for at least an hour and a half, maybe more. You also need to chop celery and onions in the stew water to add flavor and vitamins, but if you leave the skin and fat attached to the chicken you don’t need to add anything else for flavor. Many recipes today call for added butter. That is only because the recipe also calls for canned broth and the butter is needed for flavor. ( I get really disgusted with ‘chicken broth’ in a can. It has NO flavor because people are so stupidly worried about fat. Okay, don’t eat tons. But fat is very necessary for good flavor) Make your own with a fat old chicken!
When you have stewed the chicken for about 90 minutes or more the meat should be removed and placed in a separate covered dish. While it is cooling, take the big chunks of celery and onions out of the broth. You can strain it if you want. I just use a slotted spoon and scoop out most of it. Or you can leave them in. I happen to think they are unattractive after they have stewed for an hour and a half - kind of like greenish and gray rags.
When the chicken is cooled it is time to pull it off the bones. (This is the step I skipped. I figure it is easy enough to do that while you’re eating it!) To be fancy though you really need to remove the bones and cartilage and fat from the chicken. Pull it all apart and keep the bones separate from the rest. Dump the fat and skin in the same dish with the limp vegetables you removed from the broth. Stir it all together and moosh it up. When you feed the dogs, there is just enough to put a couple big spoonfuls in each dish. (Well, you gotta have four dogs… but you get the idea) They love it and the vegetables provide fresh vitamins. Set the chicken aside till just before you serve the dumplings. The cats like it, too.
The third stage is the dumpling stage. The nice thing, I think, is that the first step and the last step can be widely separated. Once you have the broth and meat prepared you can stick it in the fridge for hours or even until the next day.
My Mom taught me to make dumplings. I’ve read some other recipes that were chiefly flour and water, but I learned to use eggs and milk, flour and baking powder. Oh yes, a little salt, too. You make a heavy dough, slightly softer than cookie dough. It makes the best dumplings ever and takes about three minutes to stir up.
Bring the broth to a rolling boil-and I do mean rolling. The broth has to be boiling hard enough that you can drop the dumplings in without decreasing the heat. I’ve seen some people who roll out their dumpling dough and cut it into squares. That seems too much like noodles to me. Mom used a teaspoon and scooped a skimpy spoonful, cutting it against the side of the bowl. Wetting the spoon in the hot broth before you start makes the dumplings roll off smoothly when you dunk them in the broth. The dumplings will sink when you put them in, but soon pop to the top. When the dough is all gone, use a big spoon to gently fold them all under the hot broth once or twice, then carefully put the chicken back in the kettle. DON’T STIR. Fold carefully. You don’t want to break up the tender dumplings. It literally takes no more than ten minutes from start to finish when you make dumplings this way.
Mmmmm. I saved my carbs all day for this!! And it was worth it. We had chicken and dumplings, beets, peas and green olives. (Michael and I had the green olives. Rach doesn’t like them.) If you want you can put some vegetables in the broth and cook them just before you put the dumplings in. Peas, carrots, corn and green beans look especially pretty. Or you can serve vegetables on the side like we did.
And I was right. Michael did love them; so did Rach for that matter. She just didn’t want to make them.
Bring the broth to a rolling boil-and I do mean rolling. The broth has to be boiling hard enough that you can drop the dumplings in without decreasing the heat. I’ve seen some people who roll out their dumpling dough and cut it into squares. That seems too much like noodles to me. Mom used a teaspoon and scooped a skimpy spoonful, cutting it against the side of the bowl. Wetting the spoon in the hot broth before you start makes the dumplings roll off smoothly when you dunk them in the broth. The dumplings will sink when you put them in, but soon pop to the top. When the dough is all gone, use a big spoon to gently fold them all under the hot broth once or twice, then carefully put the chicken back in the kettle. DON’T STIR. Fold carefully. You don’t want to break up the tender dumplings. It literally takes no more than ten minutes from start to finish when you make dumplings this way.
Mmmmm. I saved my carbs all day for this!! And it was worth it. We had chicken and dumplings, beets, peas and green olives. (Michael and I had the green olives. Rach doesn’t like them.) If you want you can put some vegetables in the broth and cook them just before you put the dumplings in. Peas, carrots, corn and green beans look especially pretty. Or you can serve vegetables on the side like we did.
And I was right. Michael did love them; so did Rach for that matter. She just didn’t want to make them.


 Posts
Posts


